Booting from APE
Use
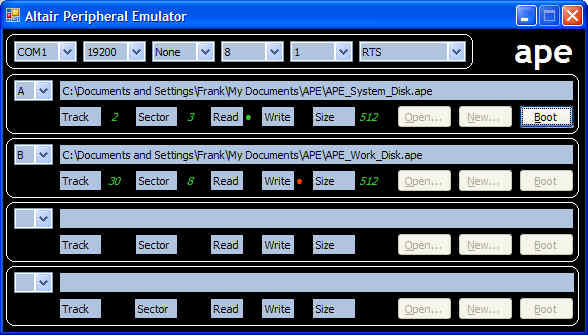
the dropdown at the top of the APE Control panel to select the COM port that is
connected to the Altair. Also select the baud rate that matches the MITS 88-2SIO
and if necessary select the type of handshaking required. The default (RTS) uses
the standard handshake signals. The (None) selection should provide for “3-wire”
operation.
It has been my experience that if a DB-9 to DB-25 converter is first connected
to the PC that a straight through RS-232 cable between the converter and the
Altair will provide proper operation. This assumes that the MITS 88-2SIO is
configured for RS-232 operation with handshaking lines installed.
Since it will be “binary” data that is transferred between the PC and the Altair
the Parity (None), Data Bits (8), and Stop Bits (1) settings should not be
changed.
In the first APE Floppy Disk panel select the “A” disk and then use the “Open…”
button to select the “APE_System_Disk.ape” file. Selecting disk “A” also enables
the “Boot” button.
With the Serial Boot Loader running on the Altair press the “Boot” button and
acknowledge the “Send Boot Sector?” prompt to start the cold boot cycle.
APE will transfer 128 bytes of the APEBOOT loader program from track 0, sector 1
to the Serial Boot Loader running on the Altair. If all has gone well the
APEBOOT loader program will start and then read the remaining sectors, 2 through
7, of track 0 and then all of the sectors, 1 through 8, of track 1. As indicated
by “Size” these sectors are each 512 bytes in length and provide storage for an
8K Operating System such as CP/M.
Finally the APEBOOT program turns over control to the BIOS portion of CP/M which
completes initialization of the Serial Port on the Altair connected to a
terminal device and then displays a sign-on message. CP/M is now up and running
on the Altair and APE will allow you to selected different files to use as
“floppy disks” with CP/M.
There are many sites on the web with lots of CP/M information and compatible
programs. Most should work fine with APE.
